Calendar integration using Acuity
SmartBot360 makes it easy to have your chatbot users make appointments without leaving the chatbot. For that, SmartBot360 integrates with Acuity, which supports its own calendar, and also integrates with Google, iCloud, and Outlook.
Here are the steps.
Step 1
Go to https://acuityscheduling.com/ to create an Acuity account if you don’t already have one.
You must have a Powerhouse Player account in order to have access to an API key needed in the next steps.
Step 2
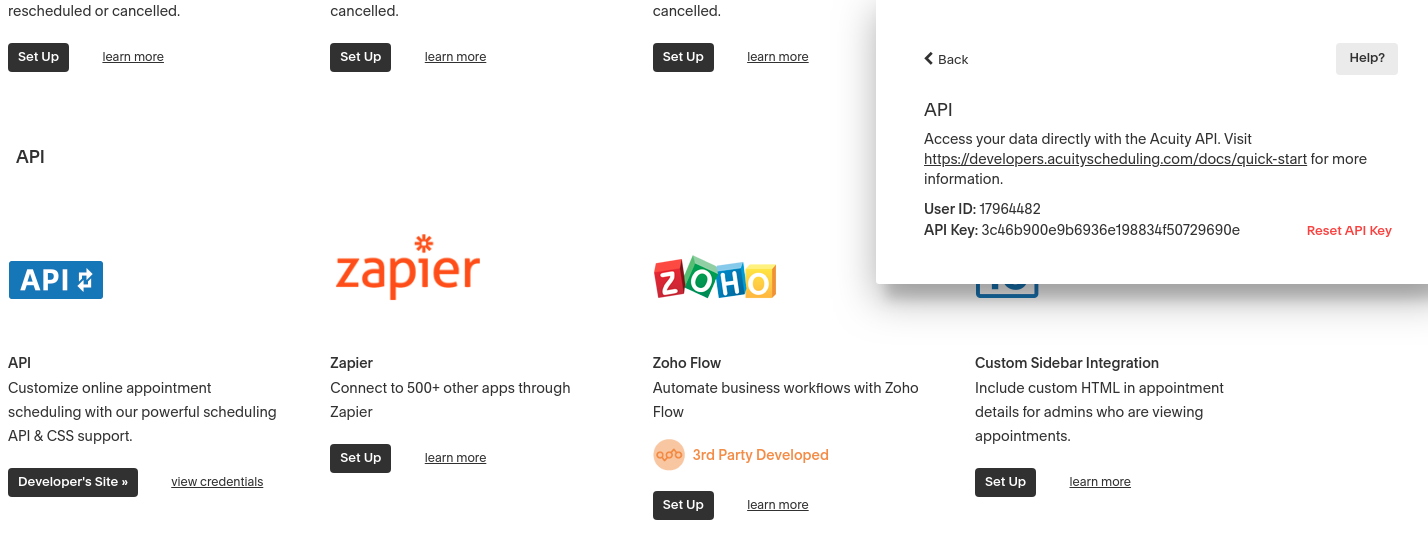
In your account, under Business Settings click Integrations, then under API click view credentials and copy the User ID and API Key.
Step 3
Next, login to your SmartBot360 Management Dashboard.
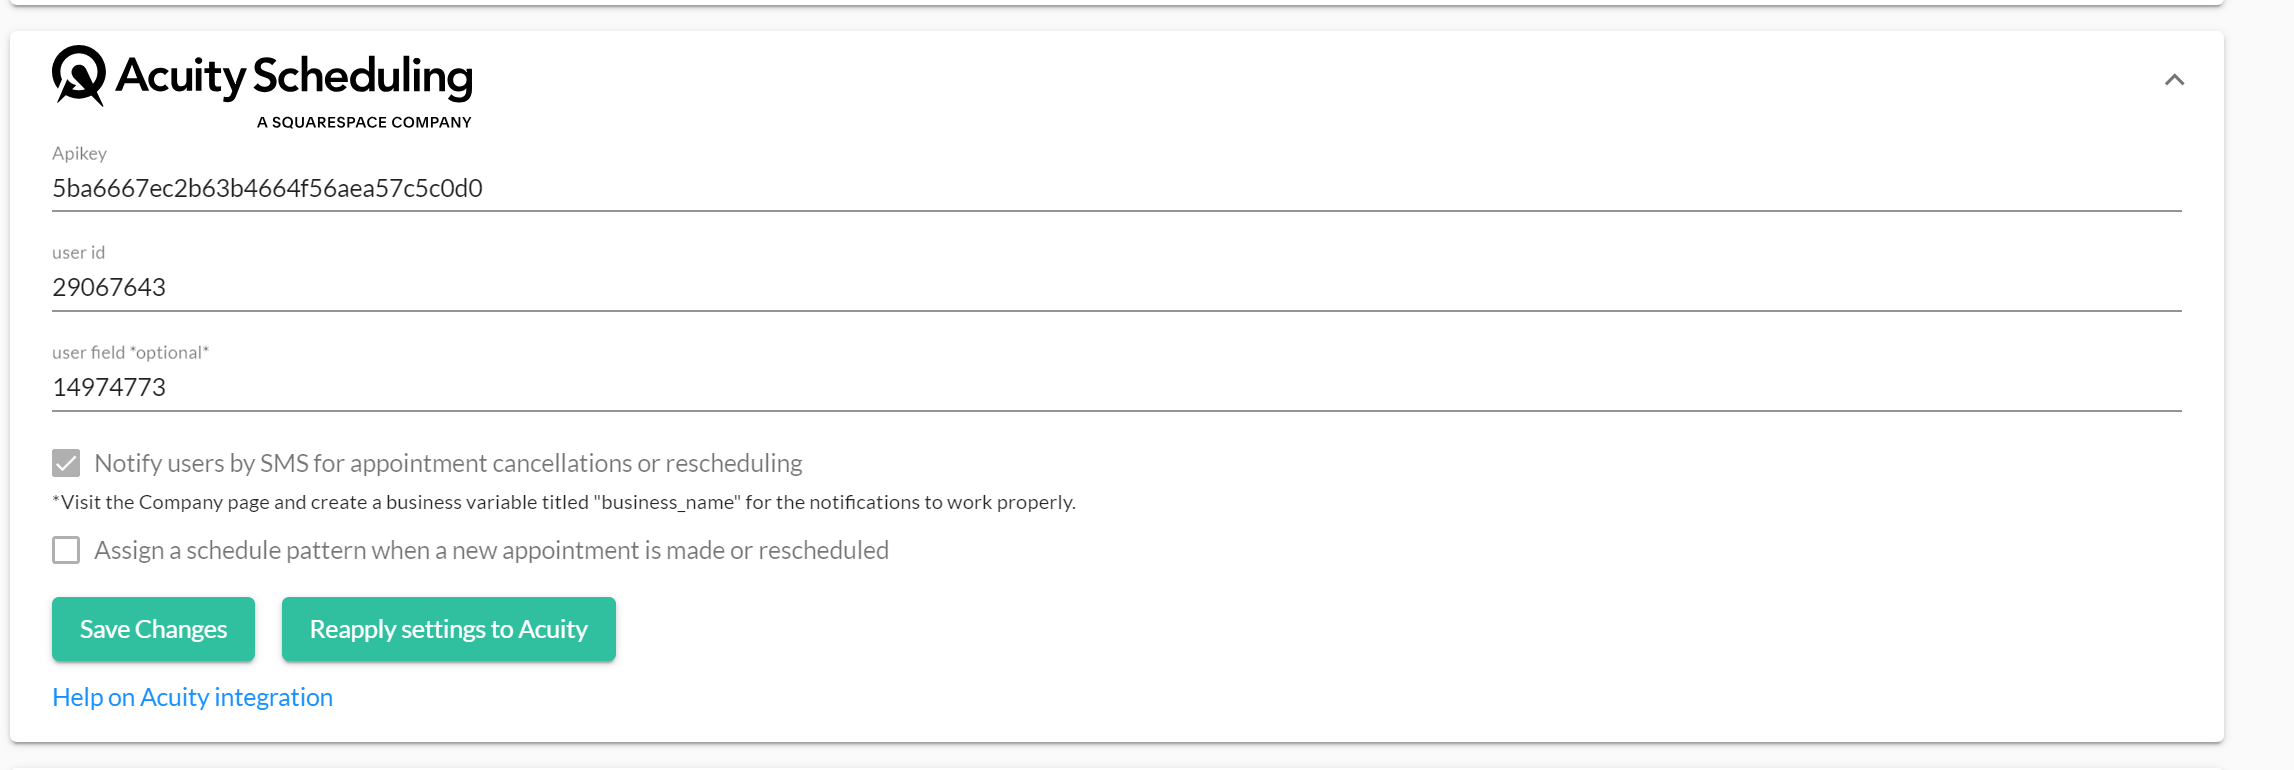
Go to the SETTINGS page, and under Integrations click on the Acuity Scheduling icon. Specify your Acuity User ID and API Key gathered from Step 2A.
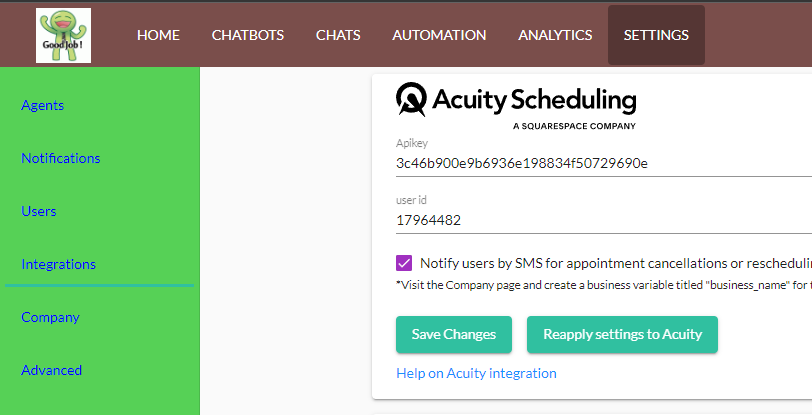
See below for information on the notification checkbox.
Once everything is completed, click the Save Changes button.
Step 4
Now you are ready to start using calendars in your bots.
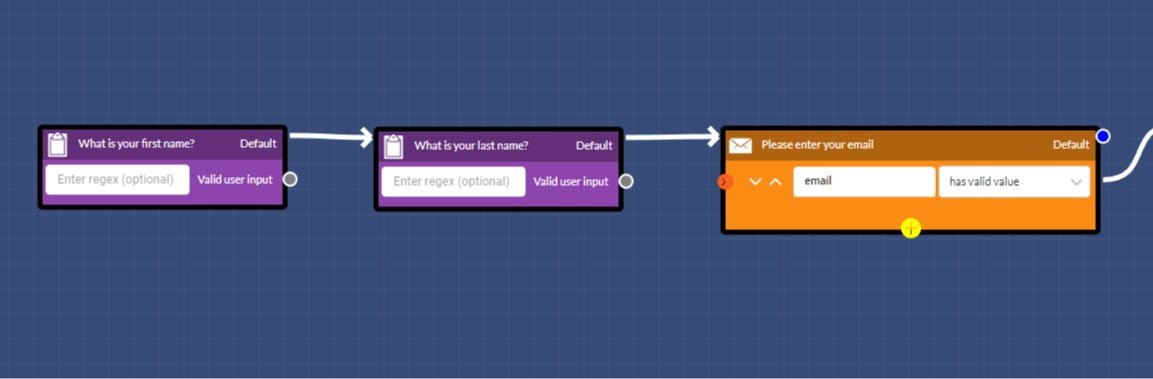
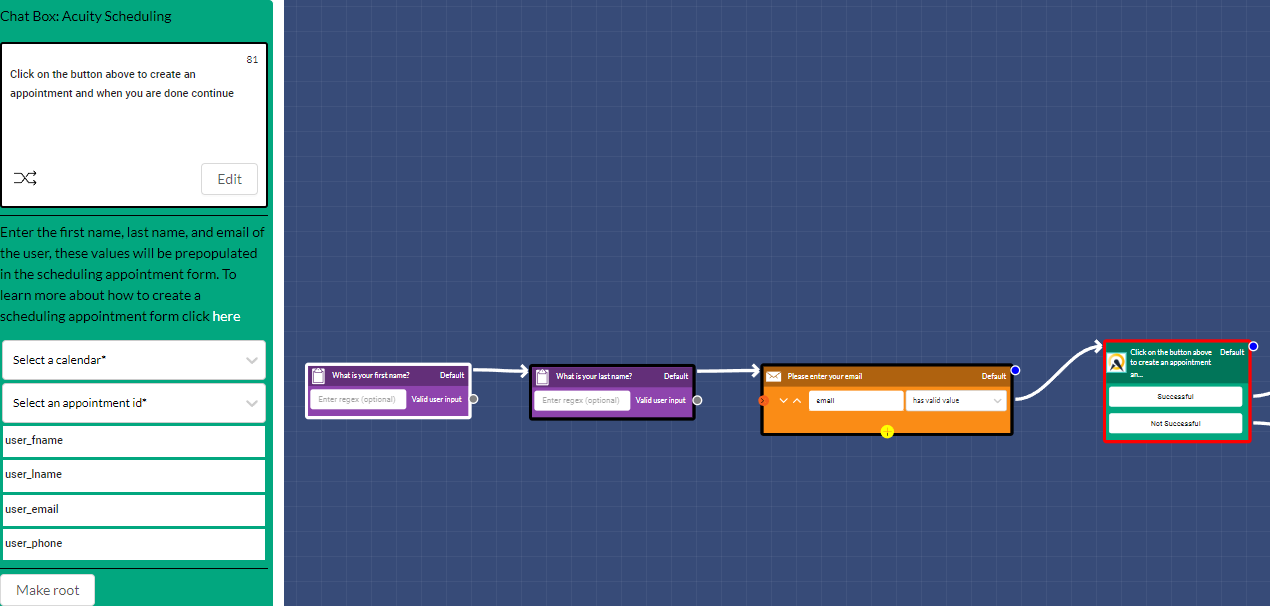
Go to CHATBOTS to create a Flow Diagram bot. The bot should collect information about the end user (first name, last name, and a valid email are required; phone number is optional). You can use the Save Field box and the Email box (and optionally the Phone box) to collect user profile information as shown below.
Step 5
Then, add an Acuity box as shown below. Note that the first three user profile variables (user_email, user_fname, user_lname) were collected in the first three boxes of the diagram. When the bot execution reaches the Acuity box, SmartBot360 will generate an acuity scheduling link for the end user to click and schedule their appointment.
Note: The date and time of the scheduling appointment will be saved in the Acuity box save field.
Set Up SMS Notifications for Appointment Cancellations/Rescheduling
Note that this applies to all appointments in your Acuity account, not only the ones made through the chatbot. For example, if you cancel an appointment through the Acuity web site, a notification SMS will be sent to the user’s phone.
This feature requires an active Twilio integration. The Twilio phone number will be the sender of these SMS notifications.
To activate this feature, check the checkbox as shown below. This will notify users (via SMS) for appointment cancellations or rescheduling.
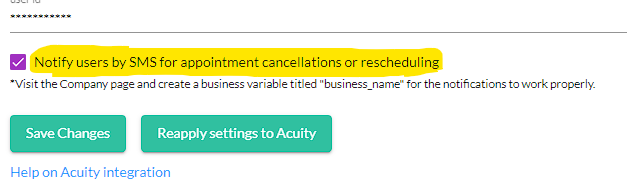
Examples of the SMS notifications are shown below. Note that the company name (SmartBot360 in example below) can be set through the business_name field (to set it, go to SETTINGS→Company).


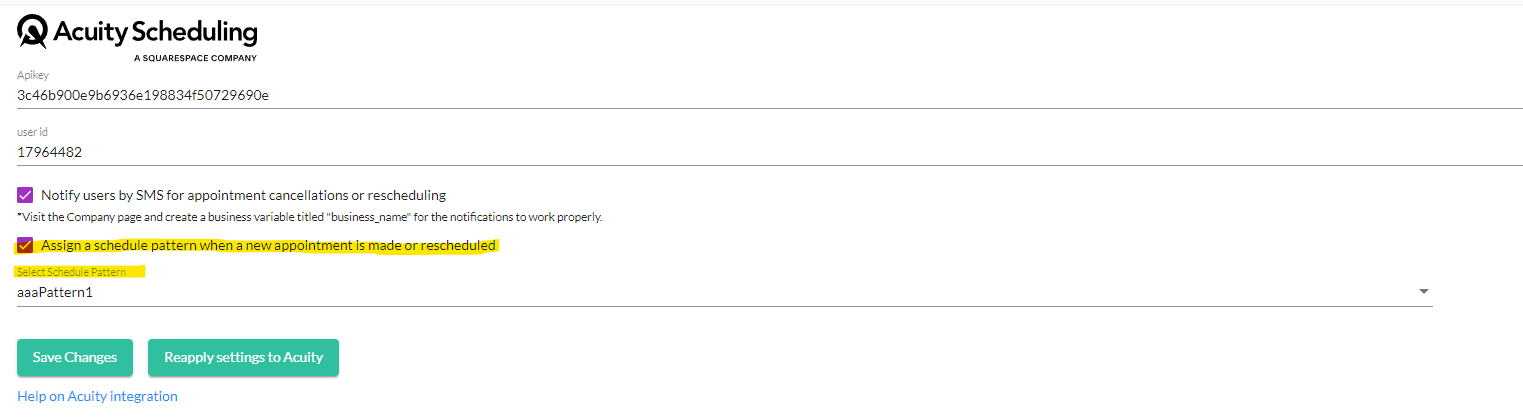
Assign a Schedule Pattern for Appointment Scheduling/Rescheduling
Note that this applies to all appointments in your Acuity account, not only the ones made through the chatbot. For example, if you schedule an appointment through the Acuity web site, a schedule pattern will be assigned to a user with the phone number entered in the Acuity form.
This feature requires an active Twilio integration.
To activate this feature, check the checkbox as shown below. Then select a schedule pattern in the dropdown. This will assign the selected schedule pattern when an appointment is scheduled or rescheduled.
Limitations
One of the limitations with the Acuity integration is accurately checking whether a user has successfully submitted a form. The Acuity scheduling form can be autofilled based on the user collection boxes, but if a user changes information on the scheduling form within the webbot, it may lead the chatbot to take the wrong path for whether an appointment has been successfully created or has failed. To prevent this, we have an optional step(s) that you can do:
Option 1
You may hide the email field from the Acuity popup window if you already collect both the user’s email and phone in the chatbot (recommended). Collecting both of these data fields in the chatbot allows more accurate capturing of the scheduled appointments by our platform.
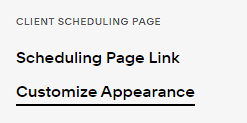
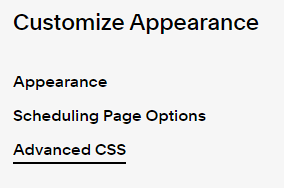
Then under Client Scheduling Page, click Customize Appearance.
Then click Advanced CSS and add the following
Add the following Custom CSS Styling code as shown below:
div:has(> #email)  {
display:none
}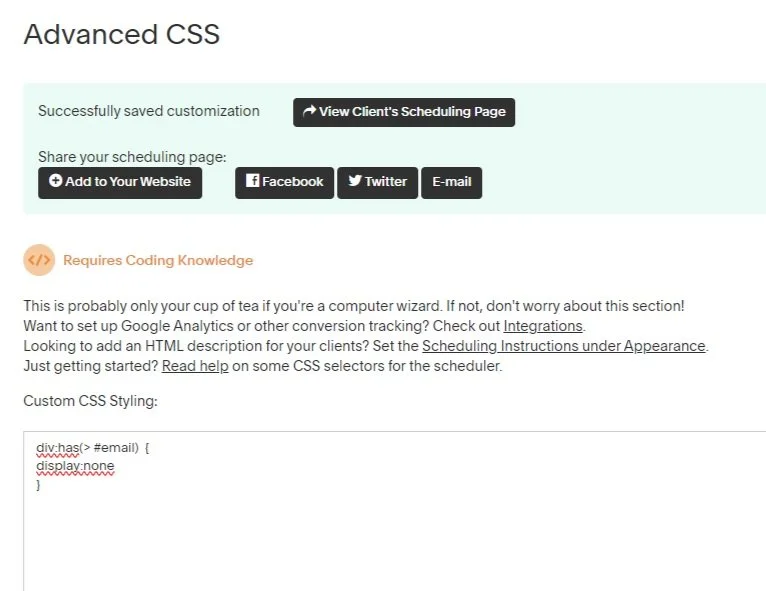
Save the custom CSS styling. Now test the scheduling form and make sure that you can submit it successfully. If the submit button doesn’t work, you may have a required field that isn’t filled out.
This should allow the system to accurately detect whether a user has submitted the scheduling form because we can use the email field from the scheduling form to check if a user with that email exists in our system and tie them together.
OPTION 2
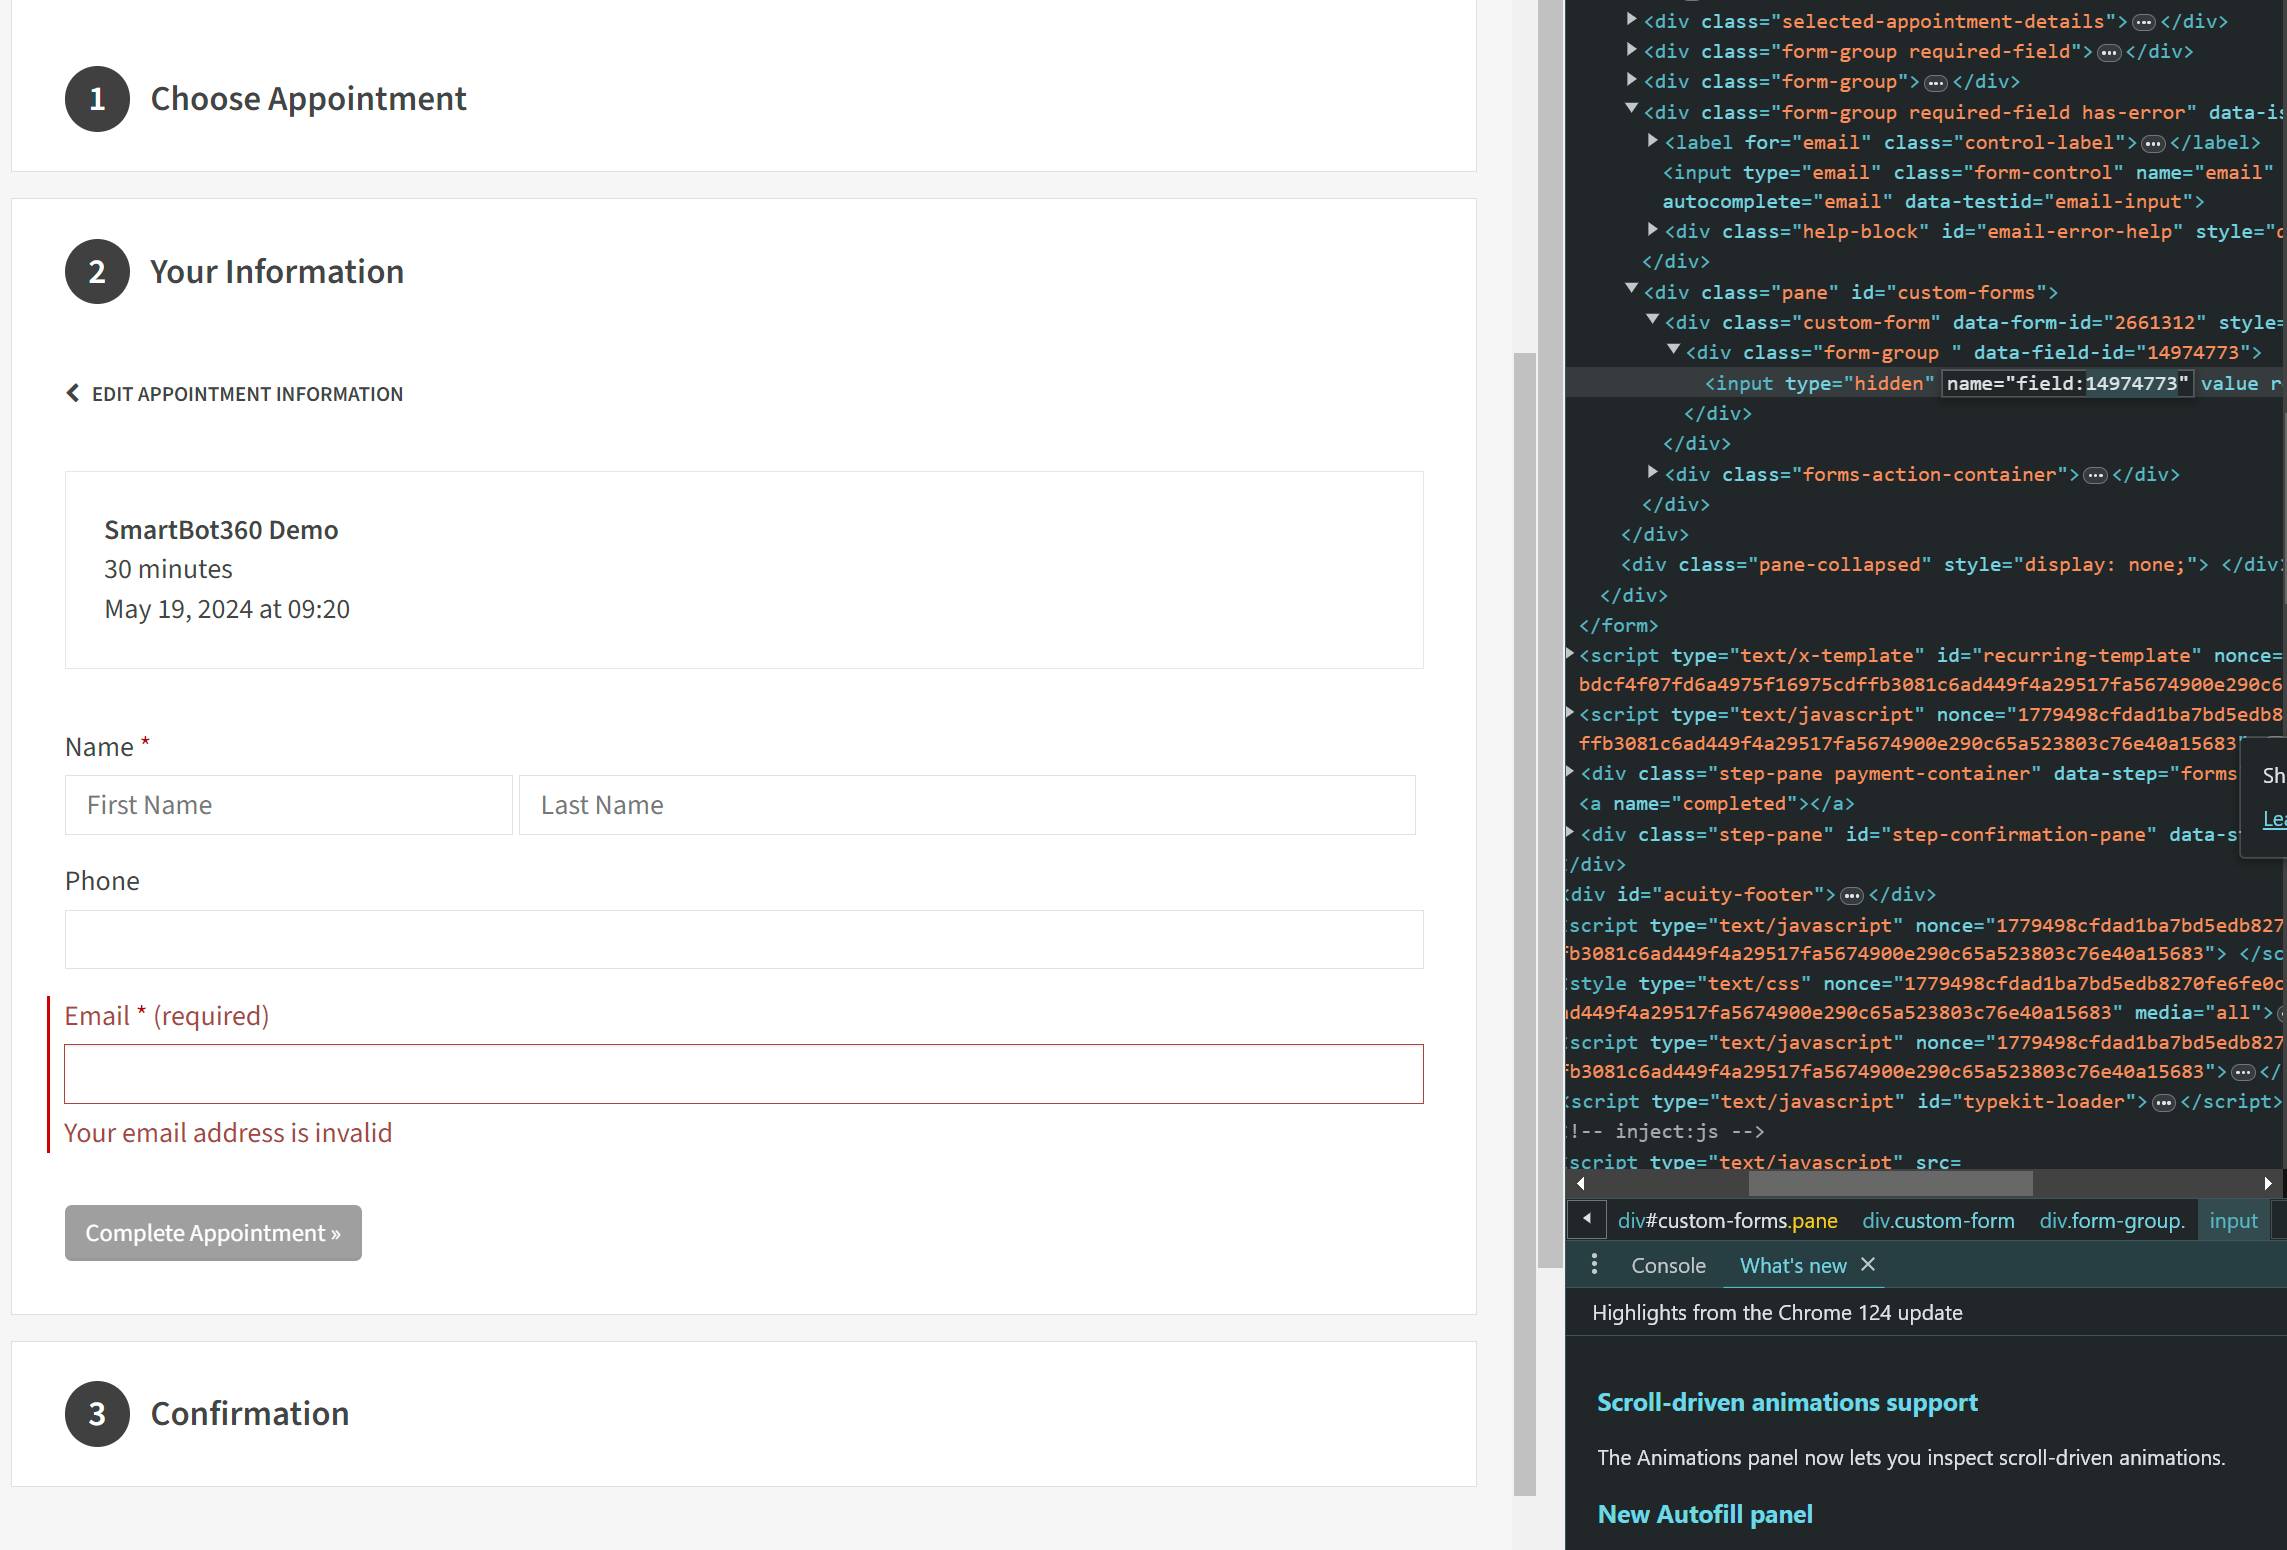
Similarly to the hidden email field, we can create a custom form field that is hidden, so the user cannot change it on the scheduling form.
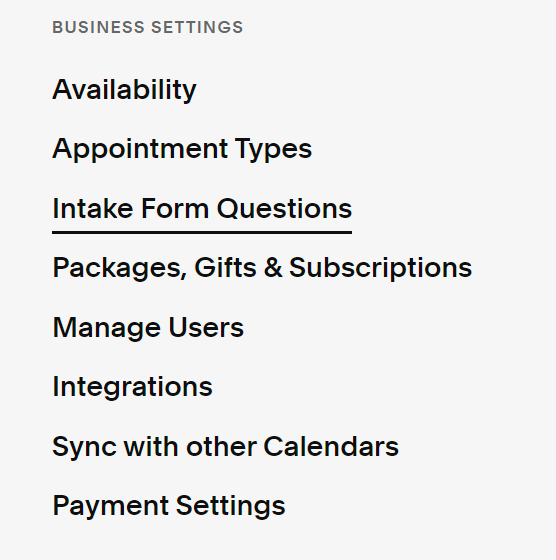
Head to ‘Intake Form Questions‘
Create a New Custom Form or edit the existing one that you currently use.

Create a textbox question with the question field being ‘userid‘. Check the ‘Internal Use Only‘ box. Also underneathe that, check all the schedule forms that you will be using the Acuity integration with. Save Question and Form and then click preview.
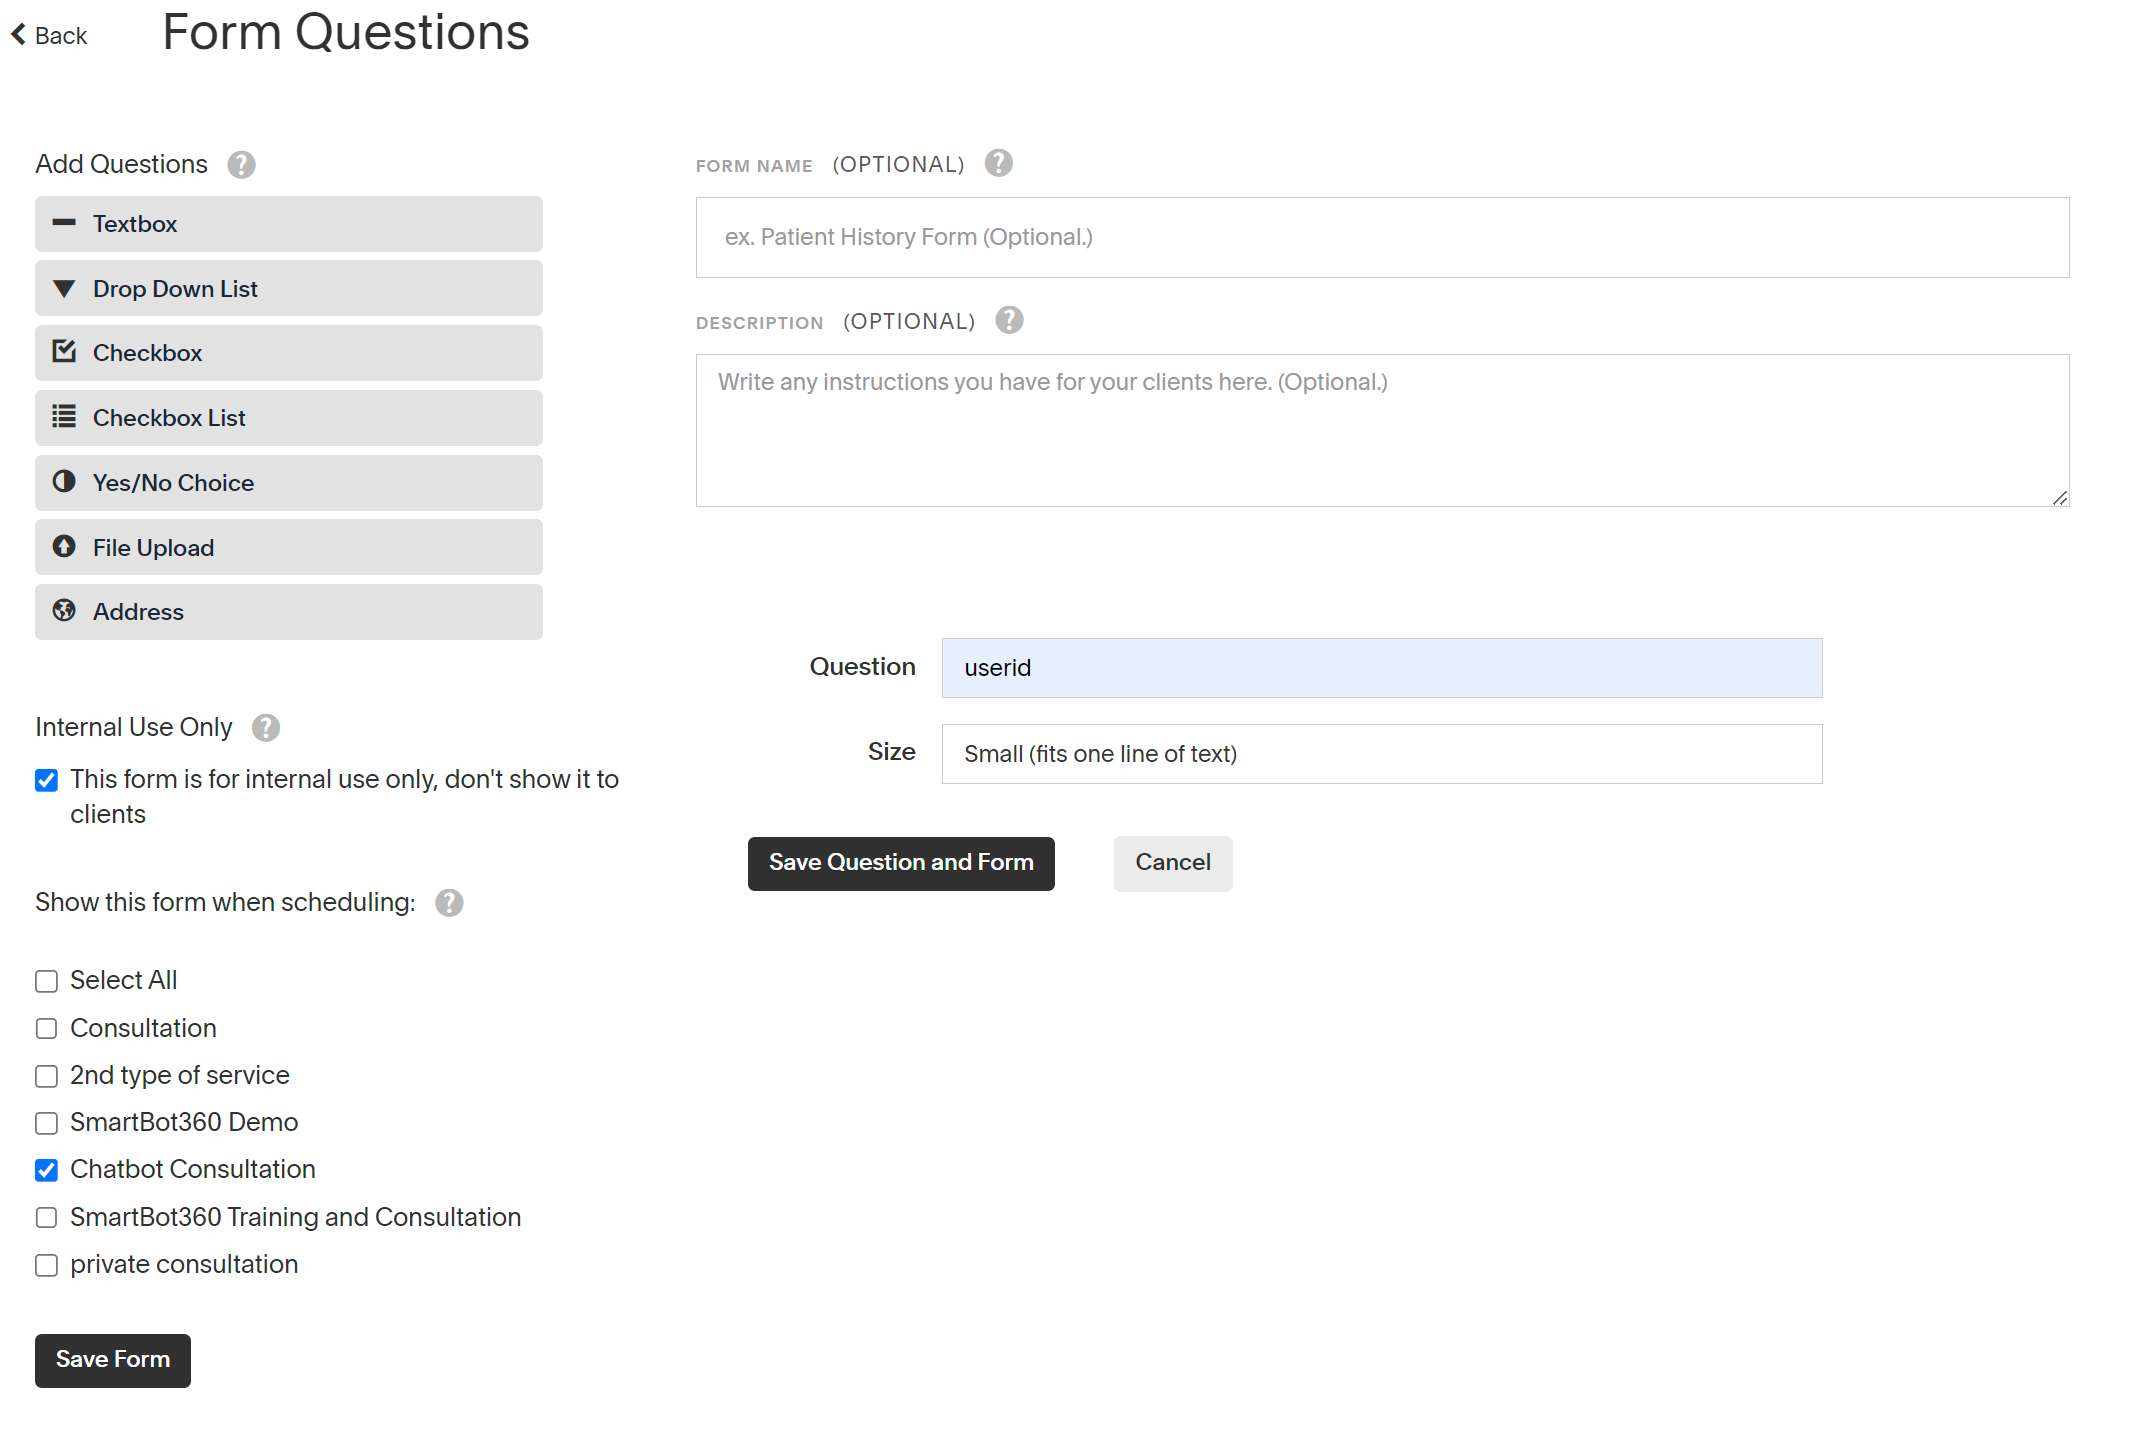
Use your browser’s developers tools to inspect the HTML elements. The one you will need to find is under the ‘custom-form‘ class which contains the hidden input field’s id. (e.g. 14974773). You will need to copy this and save it for the next step. Do not confuse this with the data-form-id as it should be the data-field id.
Paste the id into the dashboard’s integrations page under the optional ‘user field‘ textbox. Then Save Changes