
DrChrono EHR Integration

SmartBot360 offers integration to DrChrono. Specifically, a SmartBot360 chatbot may write its log (the whole chat) or a link to the SmartBot360 patient chat to a patient communication entry in a patient’s record in DrChrono. If the patient does not already exist in DrChrono, a new patient is created.
In addition to the current integration with DrChrono, SmartBot360 will work with you to add more integrations that may be useful to your business, for example, retrieve appointment or lab tests or payments. SmartBot360 offers a simple way to enable HIPAA-compliance integration of your DrChrono EHR system with a flexible conversational AI platform. This can be viewed as a complementary integration to a more traditional patient portal.
Here are the integration steps.
STEP 1
You will need to sign up for a DrChrono account. In your DrChrono account, go to Account→API and accept the terms and conditions as shown in the picture.

STEP 2
Create your DrChrono API application by filling out the form; only Application Name and Redirect URIs are needed. Leave API Version as the default selected. Set Application Name to something unique (e.g. TopDentist) and the Redirect URIs to your SmartBot360 server name with /drchrono added to the end, e.g. https://demo1.smartbot360.com/drchrono. Click Save Changes.
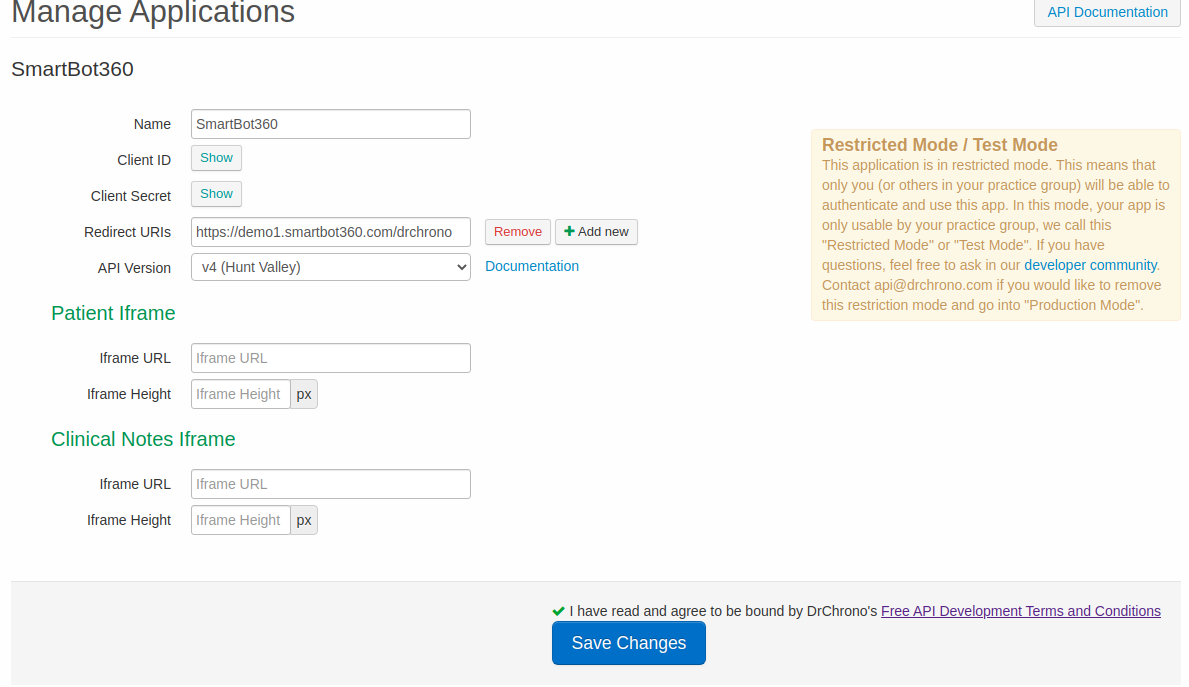
After you have created your application click on the Show buttons next to Client ID and Client Secret and copy them as they will be used later on.
STEP 3
From the top tab go to Account→Account Settings copy the Doctor ID number which will be used later.
STEP 4
Login to your SmartBot360 Dashboard, go to SETTINGS→Integrations, select DrChrono, and paste the Client ID, the Client Secret, and the Doctor ID you gathered in the previous steps. You will be asked to login to your DrChrono account to accept access.
STEP 5
Go to CHATBOTS to create a Flow Diagram bot. The bot should first collect identifying information from the user and then use this information in the DrChrono box as shown below. Specifically, you need to collect firstname, lastname, address, gender, date of birth, phone, and save them in fields user_fname, user_lname, user_address, user_gender, user_dob, user_phone, respectively.
Then, use these field names in the DrChrono box as shown below.
It is recommended that you use
Save Field or User Profile Field boxes for firstname, lastname and address
Date box for dob, where you should specify that the user should use the format YYYY-MM-DD. The Save Field should be set to user_dob.
Multiple Choice box for gender with options Male, Female, Other, Unknown. The Save Field should be set to user_gender. It is important to use these exact options as these are the only supported by DrChrono.
Phone box for phone where the message should ask the user to enter their phone in the format (XXX) XXX-XXXX
Tip: You can load a bot template for DrChrono by going to CHATBOTS→Load template bot, and then select the DrChrono template.
Possible Functions:
Insert Communication Entry - Creates a DrChrono communication entry.
Show Appointment - After confirming the user exists, displays the user’s 5 newest appointments.
Reschedule Appointment - After confirming the user exists, asks the user to select from their 5 newest appointments. Then the 5 next available dates, specified by the appointment template, will be displayed for rescheduling.
Make Appointment - After confirming the user exists, displays the 5 next available dates specified by the appointment template for selection.
Notes:
The default edge is followed only if there is an API error.
Users are looked up as a patient with a matching first name, last name, phone, and date of birth.
When making/rescheduling appointment, only the next 30 days is checked for availability.