
DocuSign integration

SmartBot360 makes it easy to have users electronically sign documents using DocuSign.
Step 1
You must have a DocuSign account with subscription to the plan Intermediate API in order to integrate with SmartBot360. You can test this integration using a free Docusign API Sandbox account.
STEP 2
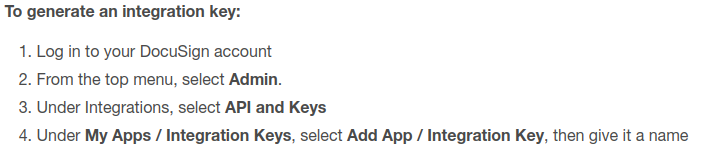
Create DocuSign integration key.
Copy the Integration Key, which you will use later.
Step 3
Set the Redirect URI of your newly created Integration Key to XXX/docusign, where XXX is the URL of your SmartBot360 Management Dashboard. For example, if your SmartBot360 server is at https://demo1.smartbot360.com, then set the Redirect URI to https://demo1.smartbot360.com/docusign (note the /docusign ending).

STEP 4
Create a secret key for your DocuSign application.

Step 5
Find your Docusign Base URI and your API Account ID
Log in to your DocuSign account
From the top menu, Select Admin.
Under Integrations, select API and Keys
Under My Account Information, copy the Account’s Base URI
Copy the API Account ID
Step 6
Login to the SmartBot360 Management Dashboard, go to SETTINGS→Integrations, then to DocuSign, and paste your Client ID ( your application integration key from step 2), Client secret (your application secret key from step 4), Base URI (your Account’s Base URI from step 5), and your account ID (your API Account ID from step 5), as shown below. You can enter production environment variables or development environment variables for testing.

Select Save Changes and you will be asked to login to your DocuSign account to authorize SmartBot360 to allow users to sign directly through our application.
Step 7
Create a template in the DocuSign dashboard and give it a name and description and upload any documents needed. The template must be given a Template Role only, no need to enter Name or Email as it will be generated through the bot flow. After the template is created click NEXT to advance to the next page where you can require signatures, emails etc in any part of the documents uploaded.


Step 8
Go to the SmartBot360 Management Dashboard, and go to CHATBOTS to create a Flow Diagram bot. The bot must first collect some information about the end user (name and email are required). You can use the User Profile box and Email box to collect user profile information as shown below. You can select the template document from the drop down. This template must be created in DocuSign where you can upload a document to sign along with the template role name specified for the recipients. The template role name is required and is created during the creation of a template. The chatbot will display a button that opens the document for signing.

You can select between a PRODUCTION or DEVELOPMENT environment in the left panel. The credentials for these environments can be specified in the Integrations page.
Then after selecting a template document, specify the recipient role. This must match a role of the template’s recipients in Docusign. In this case, the role is “Clients.”
Limitation: If multiple boxes of this integration are present in a chatbot diagram, they all share the same fields, that is, editing one box updates the fields of the others.